Showing posts with label projects. Show all posts

Friday, April 20, 2012

Olivia's Nest--Finally Finished!!

This has been a long time coming!  We had a blast putting this room together, and it is by far my favorite in the house.  The paint color is definitely a little more mustardy than I have been able to capture, but you get the general idea!

I envisioned a space for our girl that reflected us, but also gave her room to be herself.  Not too girly, modern, or whimsical, it is just the way we imagined it.

We spent about three months pulling the different elements together, and purposefully so--we spread the nursery budget over a few months of income, but also wanted to have plenty of time to scour the deals and find used items.
The majority of the time and budget went to this built-in.  Ben did an incredible job implementing exactly what I had in mind.  It definitely adds depth to the room, and works like a charm to efficiently use up the dead space made by the angled wall.  The baskets hold all of her clothing, and the bin to the left stashes taller items.
This angle is taken from the window over the built-in.
We couldn't be happier with our crib!  It was the floor model from Sugar Snap Pea (www.sugarsnappea.com), a local children's boutique here in Charleston on King Street.  Right now, we have it set up as a bassinet, but it comes with the parts to turn into a full-sized crib when we are ready for the transition a few months down the road.
We found the Ikea chair at a yardsale for $15 bucks, after a long and grueling search for a cheap glider that wasn't totally maw maw.  It is comfy and will hopefully be a good option for nursing.  Ben threw the table together last week with materials he had left over from the built-in.  Brilliant!  You can also get a glimpse of the rug in the room, which was also given to us.  So many blessings can be found in this room.
I love how the window looks out over the side yard.  There is a huge oak tree right outside her window.
Cue the adorable photos of her parents, before we hit the awkward middle school years please.  These were both taken around the same time, when I was two and Ben was four.  Awww.
This was part of one of our baby showers, all of the guests wrote a blessing and hung it on her tree.
Another adorable shower gift we received was the pink piggy bank on the far right.  Our sweet friends wrote pieces of advice on cards and deposited them in the pig--I will look there for encouragement very soon!
Another view of the lamp my sister and I painted, and the side table Ben built.
Tucked in the corner by the doorway is this tiny little school desk that came from Ben's parent's garage.  I'm sure there is a story behind it, but Ben remembers using it as a child--so we were excited to have a spot for it in O's nest.  Oh yeah, and that's "Teddy", given to Ben when he was wee little, by his brother and sister.
Her closet is jammed full of stuff that isn't hers, but at least there's room for her dresses!
We were so excited to choose scripture to claim over her life, and can't wait to teach her all about the Jesus who gives us freedom and life.
Thank you thank you Naptime Diaries for the awesome sales that afforded us the chance to hang some beautiful words in this room!
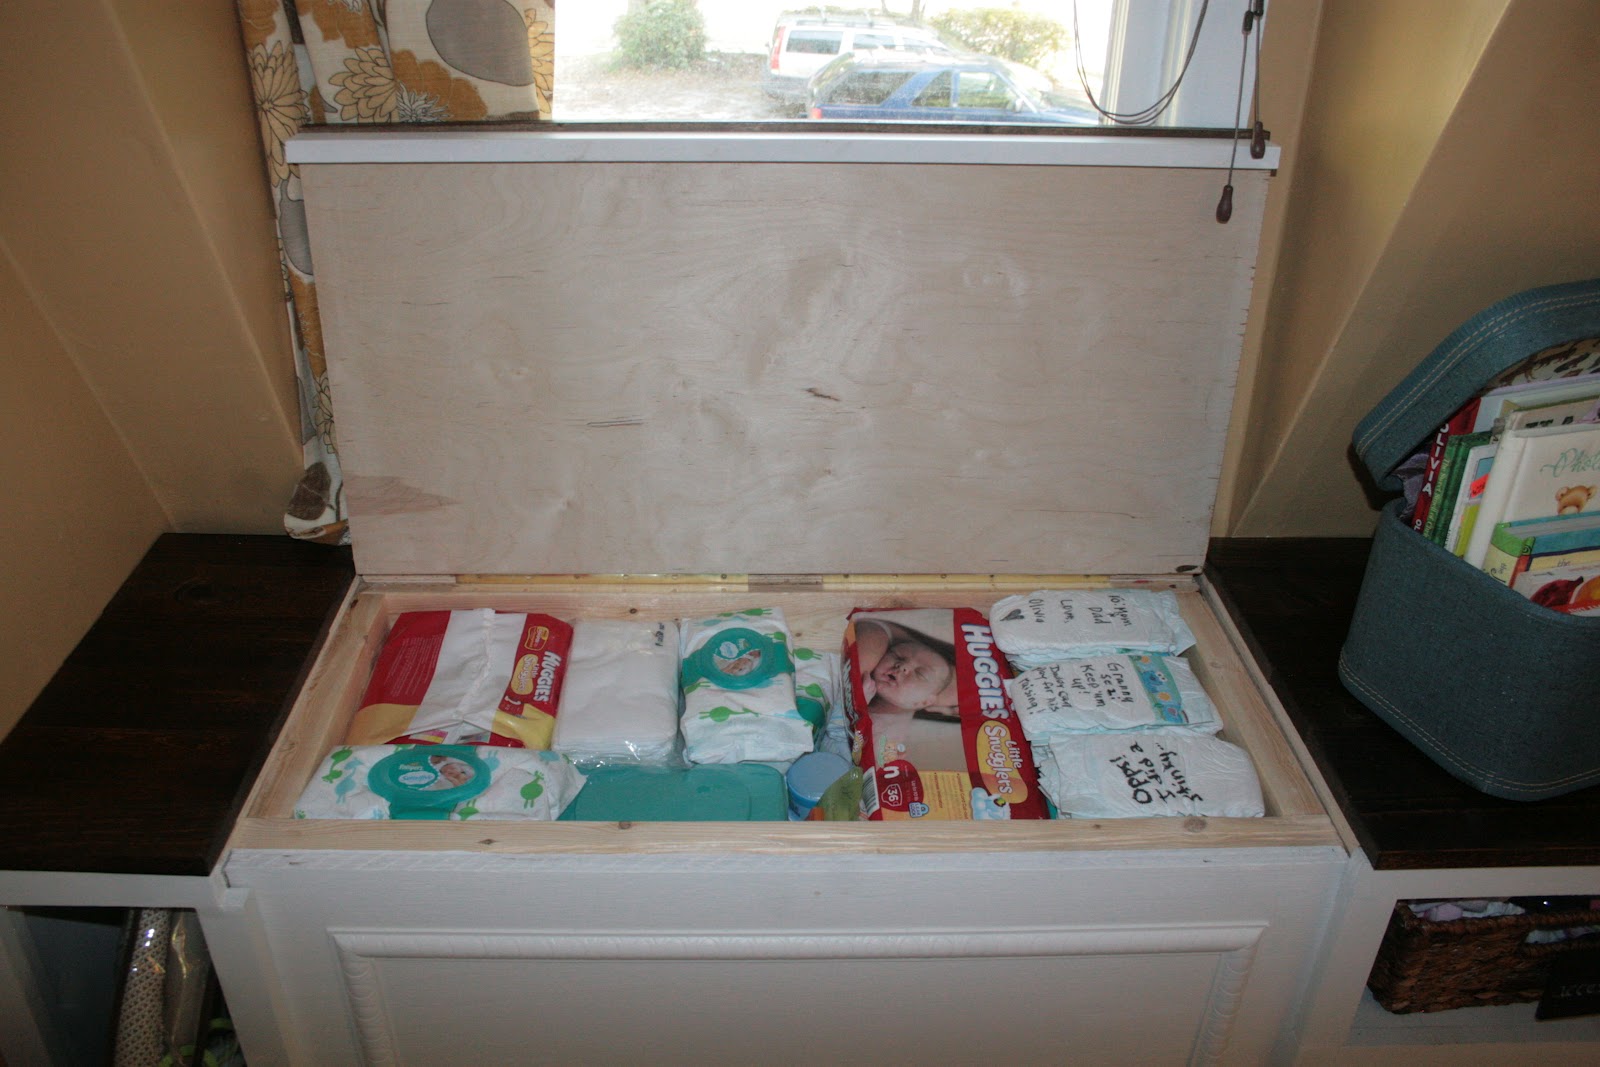
Here is the built-in mystery compartment, that will eventually be used for toys and blankets.  Right now it is FULL of diapers and wipes.  Woohoo!
I wanted to give a more detailed view of the top of the built-in...this is the seam of the secret compartment.  I may be a little biased, but I am so proud that Ben made this for his girl.
I found these pillows at Costco, and couldn't believe how well they coordinated with the curtains (from World Market)!

We have purposefully saved the space above the changing table and dresser to fill with something thoughtful and fun.  We just aren't sure what we want to place there--maybe a big print of some kind or a montage of photos of Olivia.  Who knows!  The changing table was given to us by longtime friends about six months ago, and Ben knew that would be its purpose from the first second.  We couldn't have found anything better or more meaningful.

The lighting is really terrible in this room, so we are still on the hunt for a floor lamp to place next to the changing table. 

Now all we need is the babygirl to make it perfect.  Which is really all we needed in the beginning.  All of these things are just extras!

Thursday, April 19, 2012

Dollar Bills Yall

Not that it matters, but we really had a feeling Olivia would be early.  The nature of what Ben does for a living doesn't allow much flex for taking time off on a whim, so he went ahead and took off two full weeks and a weekend.  The two weeks will wrap up this Friday.

Needless to say, he has had QUITE a bit of free time.  We very rarely have weekends together, so this weekend we knocked out a bunch of little projects that wouldn't break the bank---to the tune of using paint and materials we already had, minus three $1 cans of spray paint.

A dear friend gave us several lamps awhile back, and we hadn't put all of them to use quite yet.  While transitioning the guest room/gear wasteland to the nursery, we knew that we could use them somewhere.  This black and red lamp fit the bill perfectly, and a coat of slick white paint would wrap it nicely with the rest of the nursery decor.
My sister helped me with this project!  We had about a half of a can of primer, so we used that without sanding, hoping it would stick.  It did the trick, and then we painted the remainder with a cheapo can of glossy white spray paint.  I love the way it turned out!  Crisp and clean.  Just what we needed!

PS-This photo is cryptic for a reason--nursery reveal coming TOMORROW!!

These gems were given to me by my sister Rachel, who picked them up years ago at a flea market near my Grandma's house.  She and her husband just moved to Florida, and I'm pretty sure I ended up with them because he wouldn't let them on the moving truck.  Ben was NOT too keen on letting these in the house, but I told him that he had to give them a chance!

Halfway through, I wasn't sure I was on board.  I decided to finish them up and see what we ended up with, if not it was just one can of spray paint wasted between the pair.
I think they jive really well with the hazy purple walls that we are doing in our bedroom (pardon our progress...).  We are still piecing all of it together (Ben is currently making nightstands to replace the road cases), so we will see how they look when we get things more unified.
I saw this idea in a magazine, and tried to modify it a little bit.  TRIED.
This is the vase I use to store my spoons and spatulas, next to the stove.
We had a bunch of paint left over from painting the kitchen walls (the gallon of light grey on the right), and a few other miscellaneous colors that coordinate well with our yellow and grey kitchen.


I basically just slopped the different colors on the inside of the vase, and let it dry upside down between colors.

If I could do it over, I would have just used one solid color and coated the entire inside.  Oh well!  The vase was cracked to begin with, so I will just use it until I come across something else to use.
We found both of these chairs six months apart at the Daniel Island yardsale, and paid five bucks for each one.  They have sat untouched forever, so I was pretty excited to get this very easy project finished.
Ben did about three coats total, while I sat on the front porch swing.  My favorite project yet!


It really pops off the front porch!  Let's hope nobody steals it!

We have so much fun looking around the house for little jobs that we can knock out that don't take much from the budget.

Come back tomorrow for the long-awaited nursery post.  For as much as I have hyped it up, I sure hope you guys love it as much as we do!


Friday, April 6, 2012

Framing 101

I used to work at a frame shop.  I really loved that job.  Although, the lady I worked for was mean, unforgiving, and she hated Democrats.  Now I am a firm believer that God allows us to experience things for a purpose, sometimes which remains untold, but of this I am sure:  I learned to have the most exquisite attention to detail in the back room of that art gallery.  

This is a frame I designed and built for Ben when we started dating.  Declare was the band he was in at the time--so dreamy!  


It went something like this:  Frame goes out front with a SPECK of dust (which she always referred to as junk) on the inside of the glass.  (Customer would never notice SPECK of dust.)  Boss lady sporadically nightly inspects each piece, and discovers an imperfection.  She is mortified.  I hear about it the next day, and get to spend the next five days with her breathing down my neck.

Without realizing it, I learned quickly to achieve perfection; there were no excuses, no wasted materials, and no missed deadlines.  Or else.

I have carried this skill with me through life, and I know that it will prove to be invaluable.  I just need to be careful about expecting everyone else to have the same drive for perfection.  It can, will, and does come across as obnoxious on my part.

All of that to say: I hope to encourage some of you who have the privilege of working for or with someone that doesn't quite mesh with your style.  View it as an opportunity for growth, and try to sit under the positive things they have to share--even if shared through negativity.

Andddd back to the regularly scheduled post: Framing 101!

We start out with what is called a "ready-made" frame.  These are what most people would call a frame that you would find at Michaels, AC Moore, Target, wherever.  Some of them are wall frames, which have no "stand", if you will.  I am working with wall frames.


Disassemble the frame, and separate the components into three piles. 
1. The backing and the padding, if there is any. 
2. The mat and the placeholder "art" that came with the frame.
3. The frame itself and the glass, face down so the glass is supported off of your work surface by the rabbet (the groove which holds the glass in place).

First, we will focus on the mat and the placeholder art.  I mentioned before that I was using scrapbook paper to "mat" the prints for the nursery. 


I chose this feather print, and then another charcoal style with a little bit of shine and texture.  Framing four prints, I decided to do two of each background to keep it exciting but still streamlined.  I am afraid to get TOO busy in her little nursery.

Since the opening of the mat was larger than the surface of one sheet of scrapbook paper, I joined the paper in the most inconspicuous spot, which keep in mind will be mostly covered by the print anyway. 


Next step: attach the paper to the placeholder art.  I used scotch tape, which is NOT archival.  It will not last forever.  I figure these will not stay the same for 10 years, so it probably isn't a big deal.  There are archival tapes and papers you can buy, but if you are that worried about preservation, you probably shouldn't be framing it yourself to begin with.


We line up the mat over top of the placeholder art, to be sure that everything is covered by the matting.  In this case, I was sure to place the join mark at the bottom part of the mat, since eye level in our house (we have 7 foot ceilings!) falls at the top of the frame. 


Trim the excess paper off, and hold it up to be sure everything is flush.

The white matting you see here is called a floated double mat.  There is a small bit of space between layers, which gives it a shadowed look for more depth.  


Next, position everything how you'd like it.  In this case, I chose to have even borders, but sometimes, it is more fun to leave more space on the bottom border.  

Attach your art to the paper with scotch tape, or something else that won't show through.  Again, not archival, but works for this case.  Be careful with glue, it often changes the texture of what you're working with.


Finally, we need to reassemble everything face down.  Be sure that the hanging hook is at the top of the frame, and that your art is facing upwards in the right direction.

And don't forget to check for "junk" inside the frame!  Nobody wants to see fingerprints inside the glass!

I had some wire on hand that I used to string through the hooks in order to have some way to hang them on the wall.  Wire works best because it is very durable!  Be sure you have a snug fit, and that if you are hanging more than one, that you place the wire consistently taut, or else you will have trouble getting everything to hang evenly.


Full nursery reveal coming soon!  We are waiting on these last two prints to arrive from Naptime Diaries!   Meanwhile, I need to figure out how to photograph the paint color accurately...

People often ask me how my pictures look so fancy, and this is how I do it.  Buy frames with matting, take your time in assembly, be sure they are clean from the inside out, and hang them with precision.  You will step up the look of your prints and art by leaps and bounds.

Happy Framing!

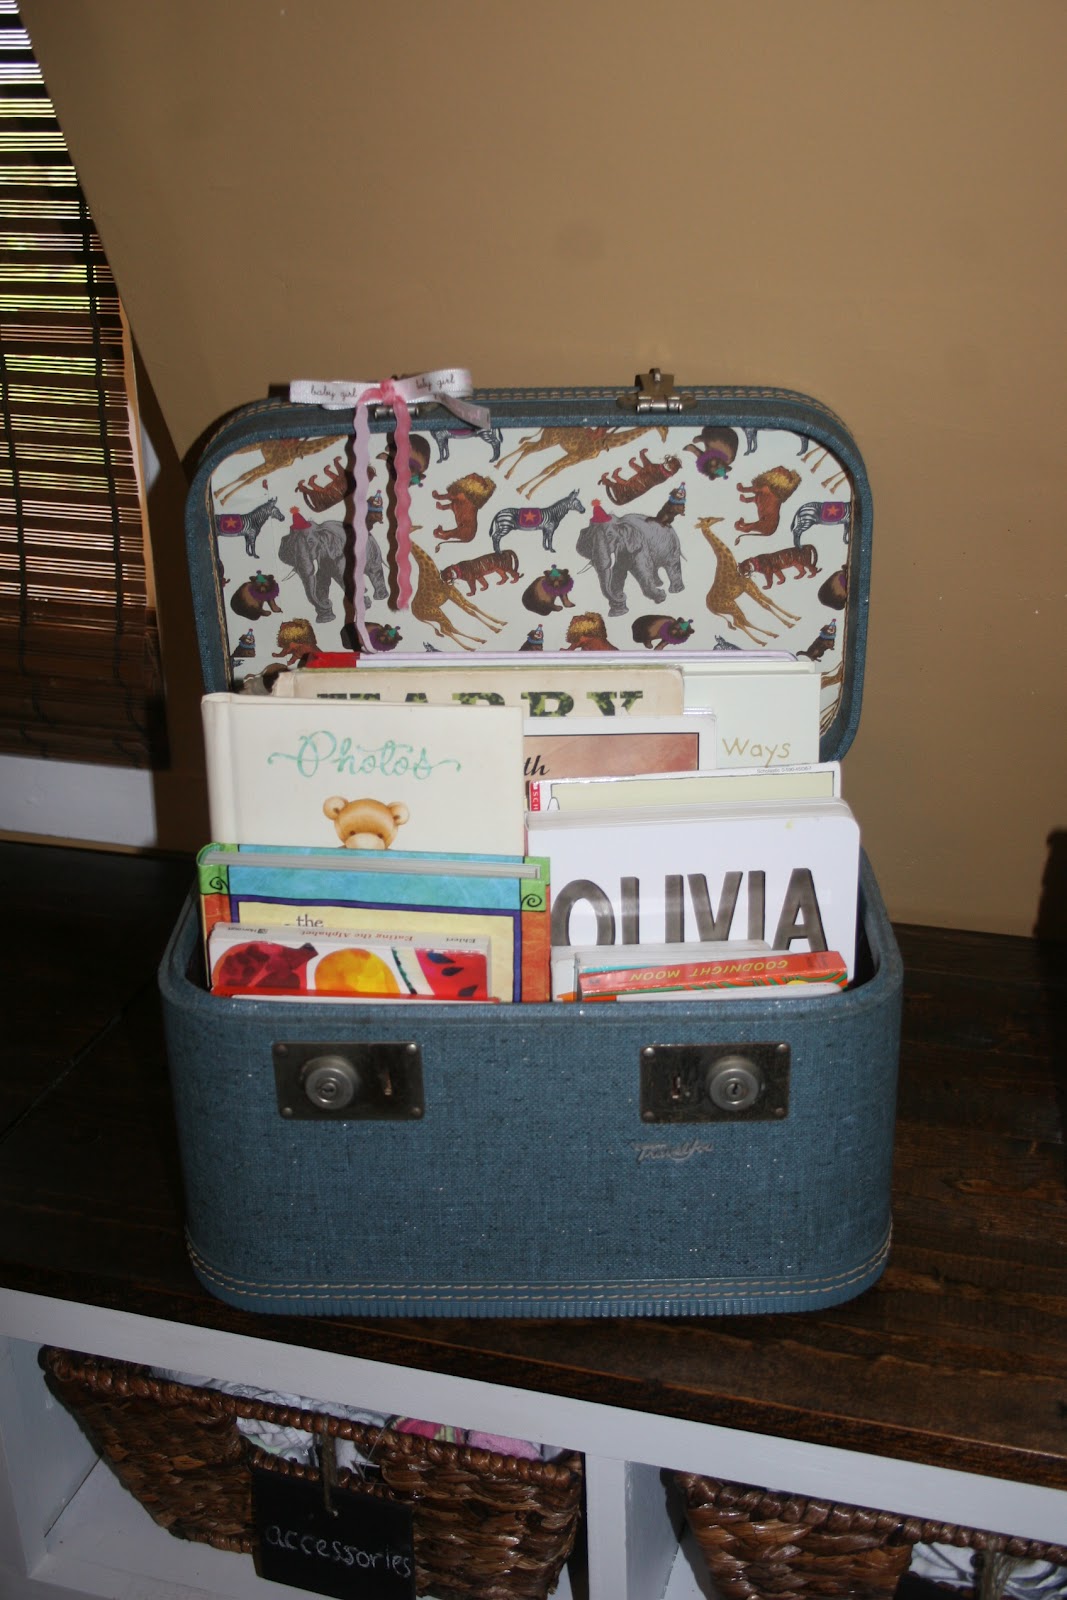
Sprucing up the Train Case

I discovered this train case at the Habitat ReStore a while back for $5.  It is just like one my grandma has, which is how it caught my eye.  It wasn't in the best shape on the inside, but I figured I could attempt to dress it up somehow.  I knew I wanted to keep books in it for now, so I decided that I could leave the inside as-is. 

While I was out getting materials for the Hanging Chalk Tags, I ran through the scrapbook paper section to grab some impromptu "matting" for the prints I needed to hang.  This circus paper caught my eye--clown free and full of rich colors that fit right into her nursery.  I didn't know what I could use it for, but at a quarter per sheet, I couldn't leave it behind.

On the way home, I remembered the train case.  The scrapbook sheets are 12 x 12, so I knew I'd have to do a little patchwork...but it was definitely worth the try.

I got started by taking some scrap paper and fitting it inside the top of the case in order to make a template.  Much easier than measuring, especially with the rounded edges.


I removed the paper and trimmed off the excess, and then traced around it onto a piece of cardboard, which was actually from the frames.


Once I cut out the cardboard, I inserted it snugly into the top of the case, just to be sure it fit.  

You can also get a good glimpse inside the case---I'll get to that eventually.


Finally, I traced the cardboard template onto the back of the scrapbook paper, trimmed the edges, and adhered it with tape.  Probably not the best way to do it, but I like to work with what's on hand.  And by the time it falls off in a few years, we will be ready to change things up anyhow.


TaDa!


There were about two inches of space that the paper didn't cover, so I just patched it together in two different spots to try to match as seamlessly as possible.  It's circus paper!  And therefore totally appropriate that the zebra's head is coming out of the sideways tiger feet.  Please tell me you wouldn't have noticed if I hadn't pointed it out?


Is there anything you could do with scrapbook paper, besides scrapbook?  It is so affordable, and there are so many styles and varieties, I will definitely be keeping that in mind for future projects.